Learning Import-CSV (The Power CLI Edition)
Learning Import-CSV (The PowerCLI Edition) - Part 1
Ever since the Import-CSV command was introduced in PowerShell it has been widely used, can be incredibly powerful, yet can be difficult for beginners to learn.
In this series of posts I will remedy that by taking you through the following:
- Part 1 – Two great ways to use Import-CSV to Import Data into an Array.
- Part 2 – How to manipulate array data using ForEach and For Statements.
- Part 3 – Real life PowerCLI use cases for Import-CSV.
For those who are here to learn import-CSV but are new or unaware of PowerCLI it is a collection of VMware cmdlets that are used in Powershell to manipulate VMware objects like Virtual Machines.
The Example
For this article we will use a sample csv located in c:\temp called VMlist.csv and it will contain the following data.
VM,Description,NumCpu
VM1,SQL VM,4
VM2,App VM,2
VM3,VCenter,4
If you aren't familiar with a csv or comma seperated file it is essentially a text file with the following characteristics:
- Each value is seperate by a comma (hence comma seperated values)
- Has a first row which is headers
- Each following line contains data with values corresponding to the headers.
In this case we have three VMs,
The first is VM1 it is described as a SQL VM and has 4 CPU,
The second is VM2 it is described as an APP VM and has 2 CPU,
and by now I'm sure you can work out the 3rd...
Importing the CSV
There is a number of ways to import a CSV in this article we will be examining 2 methods to do so.
Import Method 1 - Importing into a single array of objects
Using this method, the the whole csv is imported in to one array each line is an object each column a property.
The code to do this
$userdata = Import-CSV c:\temp\VMlist.csv
Now that wasn't so hard was it?
If we echo the result we now have:

This method is useful as each object has a number of values assigned corresponding to the headers in the CSV. I use this one the most and the more experience you have with objects the more useful this will be.
Import Method 2 - Importing one or more columns to seperate arrays
Using this method, a subset of information is imported into one or more arrays.
This is useful when you just care say about one column of data, say the VM Name. Using this method I could import just the VM Names into a list.
The code to do this:
First we declare an empty array,
$AllVMs = @()
Then the Import-Csv Statement
Import-Csv C:\temp\VMlist.csv | ForEach-Object {$AllVMs += $_.VM}
Which looks like this


The second line imports the CSV and then loops through each line of the CSV moving the VM property into an Array called $AllVMs.
When looping through an array of objects in PowerCLI the current object is referenced as $_ and the property to be used follows the '.', in this case .VM, hence $_.VM as shown above.
The '+=' operator represents "add the object as a new entry in the array". It cannot however be used to create the array. That is why the first line exists, it initialises the array $AllVMs as an empty array. Once the array exists, empty or not we can use the '+=' to add new entrys to the array.
By doing this it makes it very easy to run commands against the array, think running a command like restart-vm against those VMs in PowerCli.
Import Method 2 +
So that was unseful but what if you want to put all 3 columns in seperate arrays what does that look like? I'm glad you asked.
It looks just like this:
$AllVMs         = @()
$AllDescription = @()
$AllNumCpu      = @()
Import-Csv C:\temp\VMlist.csv | ForEach-Object {
    $AllVMs += $_.VM
    $AllDescription += $_.Description
    $AllNumCpu += $_.NumCpu
}
If you add the following to the end of the script you can clearly see the result
Write-Host
Write-Host "VMsArray"
Write-Host "==========================="
Echo $AllVMS
Write-Host
Write-Host "Description Array"
Write-Host "==========================="
Echo $AllDescription
Write-Host
Write-Host "NumCpu Array"
Write-Host "==========================="
Echo $AllNumCPU
Write-Host
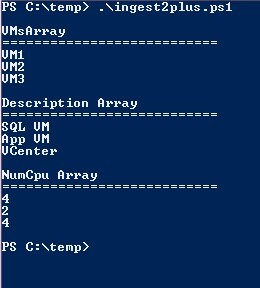
Using the example csv I get:

So now you know how to use Import-CSV to import from CSV into an array.
In the next part of the series I will show you how to manipulate array data using ForEach and For Statements
Part 2 – How to manipulate array data using ForEach and For Statements.
